Server-based example app
Download the code from here, deploy in your own account, and follow this chapter first-hand.
Before we dive in to the implementation of signed URLs, let's start with a look into what it replaces. The baseline for file downloads and uploads is the traditional server-based backend that runs without interruptions and handles all traffic from the clients.
In our example, we'll take an ecommerce site as an example where users can sell and buy digital products. The site itself needs to implement a lot of different things, such as handling authentication, listing products, and so on, but we'll concentrate on how it handles files. More specifically, we'll focus on 3 endpoints:
- how a user can download a digital product
- how a user can upload a new digital product
- and how a user can modify the files for an existing product
You can deploy the app into your own AWS account and experiment with the code. Just don't forget to destroy it when you are done as resources will continue to incur costs.

The architecture of the app is fairly straightforward. The central part is an EC2 instance that handles all backend operations. It hosts an SQLite database for structured data and it stores binaries in the filesystem.
Logins are handled by a Cognito User Pool. It implements the OAuth protocol which means the clients are redirected to a separate login page and then back to the ecommerce site. Login information is exchanged in the form of access tokens that are sent along with each authenticated request in the Authorization header.
Clients connect to a CloudFront distribution that provides routing and TLS termination. While not strictly a requirement, it is a best practice to move all traffic through a CDN. It is configured to forward all API requests to the EC2 instance.
The webapp files are hosted in an S3 bucket and CloudFront reads these files for all non-backend requests. For example, when the browser requests the index.html or the index.mjs, they are read from this bucket.
Using the app
First, let's see from a user's point of view how the app works and how to navigate between different pages!
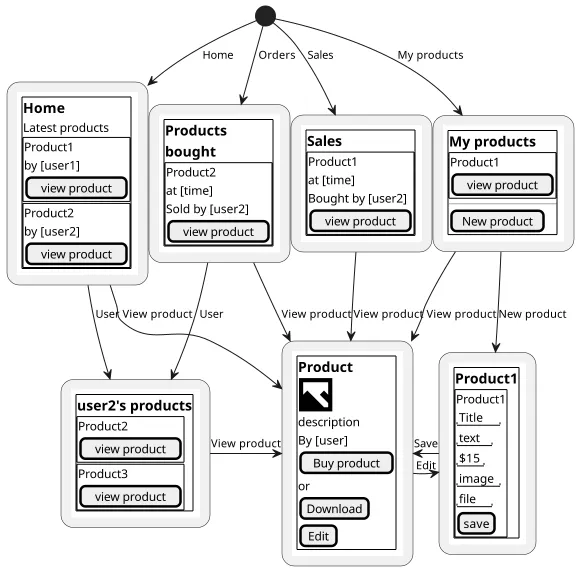
Main page
On all pages there is an upper navigation bar that allows quick access to the most important pages. Moreover, the main page shows the most recently added products.

Login
The full functionality of the site is available only to logged-in users. While browsing the available products are possible anonymously, downloading and uploading are not. Clicking on the Login link on the top right corner brings you to the login page.
Log in with user1 // Password.1.

Orders and Sales
Logging in opens the other parts of the upper navigation. The My orders page shows the list of products the user bought already.

Similarly, the Sales page shows what the user sold to other users.

Products
As we'll focus on downloads and uploads, the My products page is a more interesting one. This shows the currently added products of the current user.

Viewing a product leads to its dedicated page that shows the details of it as well as its promo image. Then there are two special buttons, depending on the relationship between the product and the user.
The "Edit" button is only visible if the user is the author of the product. This brings to the product edit page. Then the "Download" button is there if the user bought the product.

This page shows is central to one of our main focus in this book: the secure download of the product. Moreover, the promo image, while being publicly available, requires a similar implementation as it is also served from the backend.
When a user is not the author and it hasn't bought the product, the "Buy" button is available:

After buying, the file is available for download:

Also, the product is then added to the My orders list:

Add product
Users can add new products to their collection. This is done using a form with several fields, all required.

The title, text, and the price are regular input fields that directly map to a column in the database. The two interesting bits are the file inputs: the promo image and the deliverable file. This is the second item on our lists on what to focus on.
Edit product
Finally, an existing product can be edited by its author. This brings up a form similar to the "Add product" one but with value filled from the existing product.

Notice that the two file inputs are empty. This is because if there is no new value provided then their values are unchanged. This page shows our third focus: existing products can be modified with new files by changing the promo image, the file deliverable, or both. While uploading files to an existing item is similar to the process of creating new items, there are some unique challenges here.